Sound Investigation with the micro:bit
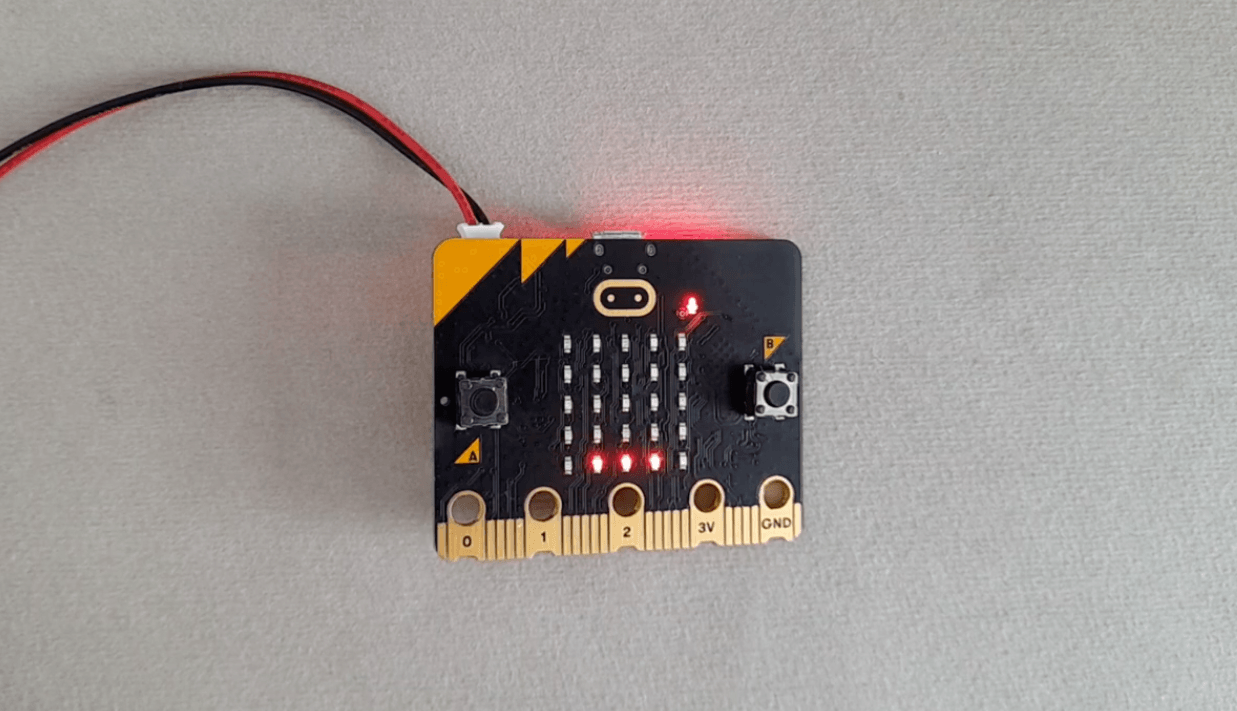
In this activity, students will use the BBC micro:bit as a scientific measurement tool to explore how sound changes over distance. Students conduct a structured investigation by playing a continuous sound at a fixed volume and code the BBC micro:bit to measure the sound levels at regular intervals using the micro:bit’s built-in microphone.
Materials
-
BBC micro:bit Sound volume experiment
https://microbit.org/projects/make-it-code-it/sound-volume-experiment/ -
Sound volume experiment introduction video
https://youtu.be/_YmGhJ1GOj0?si=0k3fNfE9eKnN4H0Y -
Sound volume experiment coding video
https://youtu.be/FWGb5nd_PJE?si=eJT2QPv6VqHrTiQl -
Example MakeCode
https://makecode.microbit.org/#pub:_DX5R4u7K83tj
Activity Instructions
- Introduce the Activity
- Discuss:
- If someone is playing music across the room, does it sound the same as when you’re standing right next to it?
- Why does sound change with distance?
- Does sound disappear or just get weaker?
- Introduce the Investigation
- We’re going to test how distance affects sound. Explain the setup:
- One sound source stays in the same place
- The micro:bit measures sound at different distances
- This is called a fair test—we only change one variable: distance.
- Code the micro:bit
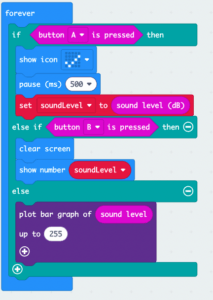
- Walk students through creating the following code or use the provided link to share the completed code with students.
- Prepare the Experiment
- Guide students:
- Place sound source at fixed location
- Mark measurement points (every 2 meters)
- Assign roles (reader, recorder, measurer, device handler)
- Tip: Keeping everything else the same helps us trust our results.
- Collect Data
- Now we gather evidence. Students measure sound at regular intervals from the source
- Steps:
- Place micro:bit next to sound source
- Press Button A to take a reading
- Press Button B to display the value
- Record the data
- Move 2 meters away
- Repeat at multiple distances
- Tip: Encourage multiple readings at each distance for accuracy
- Analyze Results
- Discuss:
- What pattern do you notice?
- Does sound increase or decrease with distance?
- Were your results consistent?
- Sound gets fainter as distance increases
- Discuss & Connect
- This is how scientists study sound in the real world. Connect to real-world uses:
- Concert and speaker placement
- Noise pollution studies
- Wildlife monitoring
- Building design
- Reflection
- Discuss:
- What did your data show?
- How did the micro:bit help you investigate?
- Why is it important to keep tests consistent?
- What would you test next?
- Introduce the Activity
- Discuss:
- If someone is playing music across the room, does it sound the same as when you’re standing right next to it?
- Why does sound change with distance?
- Does sound disappear or just get weaker?
- Discuss:
- Introduce the Investigation
- We’re going to test how distance affects sound. Explain the setup:
- One sound source stays in the same place
- The micro:bit measures sound at different distances
- This is called a fair test—we only change one variable: distance.
- We’re going to test how distance affects sound. Explain the setup:
- Code the micro:bit
- Walk students through creating the following code or use the provided link to share the completed code with students.
- Prepare the Experiment
- Guide students:
- Place sound source at fixed location
- Mark measurement points (every 2 meters)
- Assign roles (reader, recorder, measurer, device handler)
- Tip: Keeping everything else the same helps us trust our results.
- Guide students:
- Collect Data
- Now we gather evidence. Students measure sound at regular intervals from the source
- Steps:
- Place micro:bit next to sound source
- Press Button A to take a reading
- Press Button B to display the value
- Record the data
- Move 2 meters away
- Repeat at multiple distances
- Tip: Encourage multiple readings at each distance for accuracy
- Analyze Results
- Discuss:
- What pattern do you notice?
- Does sound increase or decrease with distance?
- Were your results consistent?
- Sound gets fainter as distance increases
- Discuss:
- Discuss & Connect
- This is how scientists study sound in the real world. Connect to real-world uses:
- Concert and speaker placement
- Noise pollution studies
- Wildlife monitoring
- Building design
- This is how scientists study sound in the real world. Connect to real-world uses:
- Reflection
- Discuss:
- What did your data show?
- How did the micro:bit help you investigate?
- Why is it important to keep tests consistent?
- What would you test next?
- Discuss:
- Introduce the Activity
- Discuss:
- If someone is playing music across the room, does it sound the same as when you’re standing right next to it?
- Why does sound change with distance?
- Does sound disappear or just get weaker?
- Discuss:
- Introduce the Investigation
- We’re going to test how distance affects sound. Explain the setup:
- One sound source stays in the same place
- The micro:bit measures sound at different distances
- This is called a fair test—we only change one variable: distance.
- We’re going to test how distance affects sound. Explain the setup:
- Code the micro:bit
- Walk students through creating the following code or use the provided link to share the completed code with students.
- Prepare the Experiment
- Guide students:
- Place sound source at fixed location
- Mark measurement points (every 2 meters)
- Assign roles (reader, recorder, measurer, device handler)
- Tip: Keeping everything else the same helps us trust our results.
- Guide students:
- Collect Data
- Now we gather evidence. Students measure sound at regular intervals from the source
- Steps:
- Place micro:bit next to sound source
- Press Button A to take a reading
- Press Button B to display the value
- Record the data
- Move 2 meters away
- Repeat at multiple distances
- Tip: Encourage multiple readings at each distance for accuracy
- Analyze Results
- Discuss:
- What pattern do you notice?
- Does sound increase or decrease with distance?
- Were your results consistent?
- Sound gets fainter as distance increases
- Discuss:
- Discuss & Connect
- This is how scientists study sound in the real world. Connect to real-world uses:
- Concert and speaker placement
- Noise pollution studies
- Wildlife monitoring
- Building design
- This is how scientists study sound in the real world. Connect to real-world uses:
- Reflection
- Discuss:
- What did your data show?
- How did the micro:bit help you investigate?
- Why is it important to keep tests consistent?
- What would you test next?
- Discuss:
Tips for Running Activity
- This lesson requires a continuous sound source at a fixed volume; you might like to play micro:bit’s tone.mp3 file from your computer (do not use a sound source which could vary in volume, such as a drum)
- Recommend splitting kids up in small groups where sounds can’t overlap (ie. closet, hallway,etc.) OR teacher plays ONE sounds source
- Tips (provided in lesson plan)
- Conduct the experiment in a large space with no obstacles, so that you can easily measure distances from the sound source in a straight line.
- Conduct the experiment in a quiet space.
- For more accurate results, take a few readings at each distance interval and work out their average.
- This lesson requires a continuous sound source at a fixed volume; you might like to play micro:bit’s tone.mp3 file from your computer (do not use a sound source which could vary in volume, such as a drum)
- Recommend splitting kids up in small groups where sounds can’t overlap (ie. closet, hallway,etc.) OR teacher plays ONE sounds source
- Tips (provided in lesson plan)
- Conduct the experiment in a large space with no obstacles, so that you can easily measure distances from the sound source in a straight line.
- Conduct the experiment in a quiet space.
- For more accurate results, take a few readings at each distance interval and work out their average.
- This lesson requires a continuous sound source at a fixed volume; you might like to play micro:bit’s tone.mp3 file from your computer (do not use a sound source which could vary in volume, such as a drum)
- Recommend splitting kids up in small groups where sounds can’t overlap (ie. closet, hallway,etc.) OR teacher plays ONE sounds source
- Tips (provided in lesson plan)
- Conduct the experiment in a large space with no obstacles, so that you can easily measure distances from the sound source in a straight line.
- Conduct the experiment in a quiet space.
- For more accurate results, take a few readings at each distance interval and work out their average.
Extension Opportunities
Students can:
- Graph their data (distance vs sound level)
- Compare different environments (quiet vs noisy)
- Test different sound sources
- Investigate obstacles (walls, materials)
Students can:
- Graph their data (distance vs sound level)
- Compare different environments (quiet vs noisy)
- Test different sound sources
- Investigate obstacles (walls, materials)
Students can:
- Graph their data (distance vs sound level)
- Compare different environments (quiet vs noisy)
- Test different sound sources
- Investigate obstacles (walls, materials)