micro:bit Halloween Project
This activity introduces students to wireless communication (radio) between devices by having them program two micro:bits to send and receive Halloween-themed messages such as “ghost,” “skull,” or “angry.” One micro:bit acts as a transmitter (sending messages when buttons are pressed), while the other acts as a receiver (displaying icons and playing sounds based on the message received). Students learn key computer science concepts including networks, event-driven programming, and selection (if/then logic), while engaging in a fun, interactive, and collaborative experience. The purpose is to deepen understanding of how devices communicate and respond to inputs, while encouraging creativity through customization of sounds, icons, and animations.
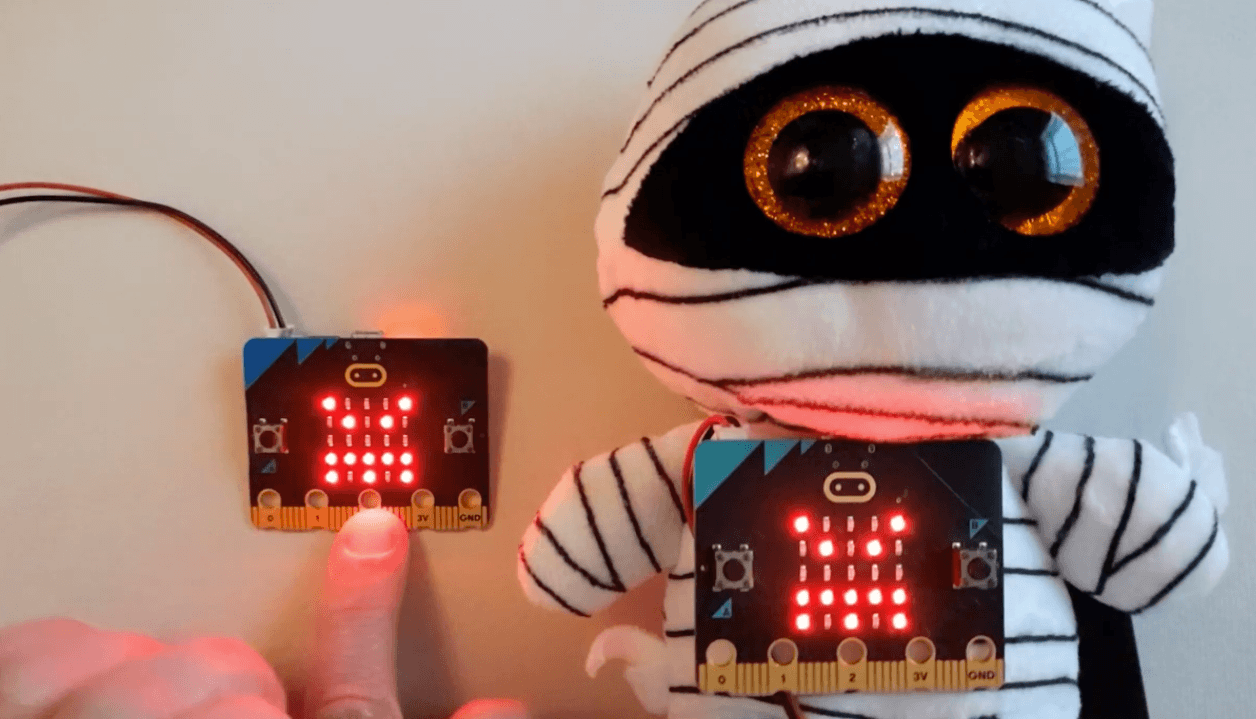
Materials
-
BBC micro:bit Halloween Project link
https://microbit.org/projects/make-it-code-it/halloween-project/ -
Halloween Project Introduction Video
https://youtu.be/LZNDie-Gi30?si=BxJ7018zTEp5E6dH -
BBC Radio Waves Video
https://youtu.be/rvymAr6WqrQ?si=HDxNJr-G-0axgHq3 -
Example MakeCode
https://makecode.microbit.org/#pub:_11viykXt3J3y
Activity Instructions
- Introduce students to the concept of a radio signals
- Discuss examples they’re familiar with and predict how they work:
- Walkie-talkies
- Review radio video
- Play “Halloween Project Introduction” from the BBC about this activity
- Transition to MakeCode
- Open MakeCode
- Click New Project
- Demonstrate finding the “radio” blocks in the “radio” tab (Hint: the radio blocks are colored pink)
- Go to Radio category
- Add ‘radio set group’ block to the “on start” block
- Set it to a number (e.g., 31)
This is like tuning into the same walkie-talkie channel.
TIP: Set Group & Channel: Always set a unique group number in “on start” to prevent interference, especially in classrooms. It might be best to assign and keep a list of assigned channels so groups know, and don’t accidentally select another channel.
- Program Sending Messages (continue demonstrating for students)
- These are strings—text messages your micro:bit sends. Only one micro:bit will SEND spooky messages.
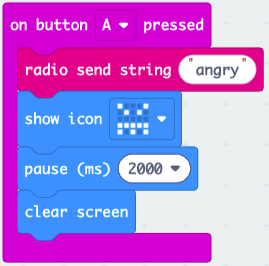
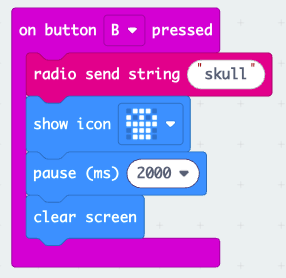
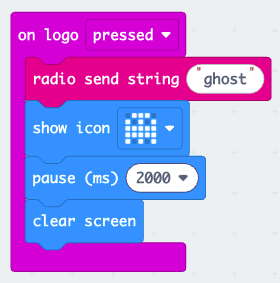
- Each of the sent message has the following components:
- A purple input block that initiates the command (press ___) with the next four blocks nested inside
- A pink radio send string “” with a description of what is being sent in the quotations.
- A show icon block with the LED image selected
- A pause block
- Clear Screen
- Program the “on button A pressed”, “on button B pressed”, “on logo pressed” blocks:
- Program Receiving Messages
- These blocks will allow the second micro:bit to listen, receive, and react to the first micro:bit’s messages
- Program the following:
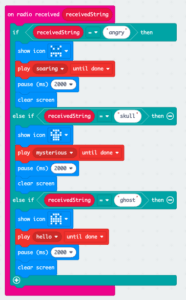
- Now test your spooky system!
- Download code to BOTH micro:bits
- Assign roles (sender vs receiver)
- Press buttons on “sender” and observe reactions on “receiver”
- Debug & Improve
- Introduce students to the concept of a radio signals
- Discuss examples they’re familiar with and predict how they work:
- Walkie-talkies
- Discuss examples they’re familiar with and predict how they work:
- Review radio video
- Play “Halloween Project Introduction” from the BBC about this activity
- Transition to MakeCode
- Open MakeCode
- Click New Project
- Demonstrate finding the “radio” blocks in the “radio” tab (Hint: the radio blocks are colored pink)
- Go to Radio category
- Add ‘radio set group’ block to the “on start” block
- Set it to a number (e.g., 31)
This is like tuning into the same walkie-talkie channel.
TIP: Set Group & Channel: Always set a unique group number in “on start” to prevent interference, especially in classrooms. It might be best to assign and keep a list of assigned channels so groups know, and don’t accidentally select another channel. - Program Sending Messages (continue demonstrating for students)
- These are strings—text messages your micro:bit sends. Only one micro:bit will SEND spooky messages.
- Each of the sent message has the following components:
- A purple input block that initiates the command (press ___) with the next four blocks nested inside
- A pink radio send string “” with a description of what is being sent in the quotations.
- A show icon block with the LED image selected
- A pause block
- Clear Screen
- Program the “on button A pressed”, “on button B pressed”, “on logo pressed” blocks:
- Program Receiving Messages
- These blocks will allow the second micro:bit to listen, receive, and react to the first micro:bit’s messages
- Program the following:
- Now test your spooky system!
- Download code to BOTH micro:bits
- Assign roles (sender vs receiver)
- Press buttons on “sender” and observe reactions on “receiver”
- Debug & Improve
- Introduce students to the concept of a radio signals
- Discuss examples they’re familiar with and predict how they work:
- Walkie-talkies
- Discuss examples they’re familiar with and predict how they work:
- Review radio video
- Play “Halloween Project Introduction” from the BBC about this activity
- Transition to MakeCode
- Open MakeCode
- Click New Project
- Demonstrate finding the “radio” blocks in the “radio” tab (Hint: the radio blocks are colored pink)
- Go to Radio category
- Add ‘radio set group’ block to the “on start” block
- Set it to a number (e.g., 31)
This is like tuning into the same walkie-talkie channel.
TIP: Set Group & Channel: Always set a unique group number in “on start” to prevent interference, especially in classrooms. It might be best to assign and keep a list of assigned channels so groups know, and don’t accidentally select another channel. - Program Sending Messages (continue demonstrating for students)
- These are strings—text messages your micro:bit sends. Only one micro:bit will SEND spooky messages.
- Each of the sent message has the following components:
- A purple input block that initiates the command (press ___) with the next four blocks nested inside
- A pink radio send string “” with a description of what is being sent in the quotations.
- A show icon block with the LED image selected
- A pause block
- Clear Screen
- Program the “on button A pressed”, “on button B pressed”, “on logo pressed” blocks:
- Program Receiving Messages
- These blocks will allow the second micro:bit to listen, receive, and react to the first micro:bit’s messages
- Program the following:
- Now test your spooky system!
- Download code to BOTH micro:bits
- Assign roles (sender vs receiver)
- Press buttons on “sender” and observe reactions on “receiver”
- Debug & Improve
Tips for Running Activity
- Set Group & Channel: Always set a unique group number in on start to prevent interference, especially in classrooms. It might be best to assign and keep a list of assigned channels so groups know, and don’t accidentally select another channel.
- Power Levels: Adjust signal strength to increase range or lower it for debugging in confined spaces.
Handle Data Types: You can send strings (text) or numbers. For complex data, consider sending simple number codes and decoding them on the receiving end.
- Receive and Display: The on radio received block allows the micro:bit to wait for messages, which can then be displayed using show string or show number.
- Don’t forget to download code to BOTH micro:bits
- Connection to Networks – A network is just a group of devices talking to each other. Your micro:bits formed a tiny wireless network—sending messages, receiving them, and reacting.
- Set Group & Channel: Always set a unique group number in on start to prevent interference, especially in classrooms. It might be best to assign and keep a list of assigned channels so groups know, and don’t accidentally select another channel.
- Power Levels: Adjust signal strength to increase range or lower it for debugging in confined spaces.
Handle Data Types: You can send strings (text) or numbers. For complex data, consider sending simple number codes and decoding them on the receiving end. - Receive and Display: The on radio received block allows the micro:bit to wait for messages, which can then be displayed using show string or show number.
- Don’t forget to download code to BOTH micro:bits
- Connection to Networks – A network is just a group of devices talking to each other. Your micro:bits formed a tiny wireless network—sending messages, receiving them, and reacting.
- Set Group & Channel: Always set a unique group number in on start to prevent interference, especially in classrooms. It might be best to assign and keep a list of assigned channels so groups know, and don’t accidentally select another channel.
- Power Levels: Adjust signal strength to increase range or lower it for debugging in confined spaces.
Handle Data Types: You can send strings (text) or numbers. For complex data, consider sending simple number codes and decoding them on the receiving end. - Receive and Display: The on radio received block allows the micro:bit to wait for messages, which can then be displayed using show string or show number.
- Don’t forget to download code to BOTH micro:bits
- Connection to Networks – A network is just a group of devices talking to each other. Your micro:bits formed a tiny wireless network—sending messages, receiving them, and reacting.
Exit Ticket Reflection Questions
- How did your micro:bits communicate?
- How did your code decide what to do?
- What would you add to make it scarier?
- How did your micro:bits communicate?
- How did your code decide what to do?
- What would you add to make it scarier?
- How did your micro:bits communicate?
- How did your code decide what to do?
- What would you add to make it scarier?
Extension Opportunities
- Create custom LED designs
- Add animations instead of static images
- Compose custom spooky music
- Hide the receiver to surprise someone 👀
- Create custom LED designs
- Add animations instead of static images
- Compose custom spooky music
- Hide the receiver to surprise someone 👀
- Create custom LED designs
- Add animations instead of static images
- Compose custom spooky music
- Hide the receiver to surprise someone 👀
Answer Keys / Exemplars
- Example code: https://makecode.microbit.org/#pub:_11viykXt3J3y
- Example code: https://makecode.microbit.org/#pub:_11viykXt3J3y
- Example code: https://makecode.microbit.org/#pub:_11viykXt3J3y