micro:bit Guitar – Touch Tunes
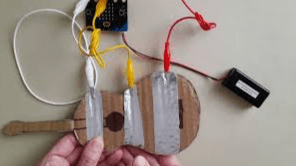
In this activity, students will design and build a simple guitar instrument using cardboard and foil connected to a micro:bit’s pins. Instead of using built-in buttons, students create their own touch-sensitive inputs by completing an electrical circuit with their fingers. When a student touches both the ground (GND) and a pin (like pin 1 or 2), the micro:bit detects the signal and plays a programmed tune.
This project introduces key concepts including input/output systems, electrical circuits, and physical computing, while reinforcing coding skills like conditional logic and event detection. Its purpose is to help students understand how hardware and software interact, while encouraging creativity through designing their own instrument and composing music.
Materials
-
BBC micro:bit Touch Tunes Project link
https://microbit.org/projects/make-it-code-it/guitar-1-touch-tunes/ -
micro:bit Guitar Tutorial - Tin Foil Electronics
https://youtu.be/-N517gGow9s?si=vqeWYIgAi7kQh_80 -
Guitar 1 touch tunes introduction
https://youtu.be/3lZOkUlGsdQ?si=Wnl2rlWZ9pRHF9P2 -
micro:bit Pins Video
https://youtu.be/EDgdHb0R96I?si=zLhj0ygoY44I2ea2
-
Example MakeCode
https://makecode.microbit.org/#pub:_A67YTJ19o05p -
Guitar 1 touch tunes coding video
https://youtu.be/3WN38T8eq30?si=qnjhHYQzl-MifNMt
Main Resource Instructions
- Introduce the Activity
- Today, you’re going to turn cardboard into a musical instrument using code.
- Predict: What micro:bit functions/sensors will be used in order to allow the cardboard to communicate with the micro:bit and result in music?
- Discussion questions:
- How do instruments usually make sound?
- How could we connect something external to the micro:bit
- Would the cardboard be used as an input or an output?
- Introduce the concept
- The micro:bit can detect touch through its pins. When you touch a pin AND ground, you complete a circuit.
- Take a moment to identify the micro:bit “pins”
- Watch “pins” video – https://youtu.be/EDgdHb0R96I?si=zLhj0ygoY44I2ea2
- The touch circuit we are making work because:
- Electricity needs a complete path (circuit)
- Your body helps close that path
- The micro:bit detects that signal and runs code
- When a pin is touched, the program plays a sound
- Build the Guitar
- Let’s build your instrument first.
- Cut a guitar or keyboard shape from cardboard
- Add foil strips (these are touch pads)
- Connect wires:
- One to GND (ground)
- One to Pin 1
- One to Pin 2
- Attach wires to foil strips – These foil pieces are your keys or strings.
- Example:
- Code the micro:bit
- Now we tell the micro:bit what to do when you touch it.
- Program if pin 1 is touched → play melody
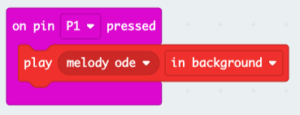
- Program if pin 2 is touched → play different melody

- Download & Test: Let’s test your instrument!
- Download code to micro:bit
- Verify your cords are connected
- Make music by holding:
- One finger on GND
- One finger on a foil strip
- Test your guitar – The different foil strips should trigger different tunes
- Debugging: – if it’s not working, check:
- Are you touching GND AND a pin?
- Are wires securely connected?
- Did you download your code?
- Introduce the Activity
- Today, you’re going to turn cardboard into a musical instrument using code.
- Predict: What micro:bit functions/sensors will be used in order to allow the cardboard to communicate with the micro:bit and result in music?
- Discussion questions:
- How do instruments usually make sound?
- How could we connect something external to the micro:bit
- Would the cardboard be used as an input or an output?
- Introduce the concept
- The micro:bit can detect touch through its pins. When you touch a pin AND ground, you complete a circuit.
- Take a moment to identify the micro:bit “pins”
- Watch “pins” video – https://youtu.be/EDgdHb0R96I?si=zLhj0ygoY44I2ea2
- The touch circuit we are making work because:
- Electricity needs a complete path (circuit)
- Your body helps close that path
- The micro:bit detects that signal and runs code
- When a pin is touched, the program plays a sound
- Take a moment to identify the micro:bit “pins”
- The micro:bit can detect touch through its pins. When you touch a pin AND ground, you complete a circuit.
- Build the Guitar
- Let’s build your instrument first.
- Cut a guitar or keyboard shape from cardboard
- Add foil strips (these are touch pads)
- Connect wires:
- One to GND (ground)
- One to Pin 1
- One to Pin 2
- Attach wires to foil strips – These foil pieces are your keys or strings.
- Example:
- Let’s build your instrument first.
- Code the micro:bit
- Now we tell the micro:bit what to do when you touch it.
- Program if pin 1 is touched → play melody
- Program if pin 2 is touched → play different melody
- Download & Test: Let’s test your instrument!
- Download code to micro:bit
- Verify your cords are connected
- Make music by holding:
- One finger on GND
- One finger on a foil strip
- Test your guitar – The different foil strips should trigger different tunes
- Debugging: – if it’s not working, check:
- Are you touching GND AND a pin?
- Are wires securely connected?
- Did you download your code?
- Introduce the Activity
- Today, you’re going to turn cardboard into a musical instrument using code.
- Predict: What micro:bit functions/sensors will be used in order to allow the cardboard to communicate with the micro:bit and result in music?
- Discussion questions:
- How do instruments usually make sound?
- How could we connect something external to the micro:bit
- Would the cardboard be used as an input or an output?
- Introduce the concept
- The micro:bit can detect touch through its pins. When you touch a pin AND ground, you complete a circuit.
- Take a moment to identify the micro:bit “pins”
- Watch “pins” video – https://youtu.be/EDgdHb0R96I?si=zLhj0ygoY44I2ea2
- The touch circuit we are making work because:
- Electricity needs a complete path (circuit)
- Your body helps close that path
- The micro:bit detects that signal and runs code
- When a pin is touched, the program plays a sound
- Take a moment to identify the micro:bit “pins”
- The micro:bit can detect touch through its pins. When you touch a pin AND ground, you complete a circuit.
- Build the Guitar
- Let’s build your instrument first.
- Cut a guitar or keyboard shape from cardboard
- Add foil strips (these are touch pads)
- Connect wires:
- One to GND (ground)
- One to Pin 1
- One to Pin 2
- Attach wires to foil strips – These foil pieces are your keys or strings.
- Example:
- Let’s build your instrument first.
- Code the micro:bit
- Now we tell the micro:bit what to do when you touch it.
- Program if pin 1 is touched → play melody
- Program if pin 2 is touched → play different melody
- Download & Test: Let’s test your instrument!
- Download code to micro:bit
- Verify your cords are connected
- Make music by holding:
- One finger on GND
- One finger on a foil strip
- Test your guitar – The different foil strips should trigger different tunes
- Debugging: – if it’s not working, check:
- Are you touching GND AND a pin?
- Are wires securely connected?
- Did you download your code?
Assessment Opportunities
- Check for understand: When you touch both parts, you complete a circuit. A tiny electrical signal flows through you, and the micro:bit detects it and plays a sound.
- What was the input?
- What was the output?
- What caused the sound?
- Reflection
- How did your body help the circuit work?
- What caused the music to play?
- How is this different from pressing a button?
- What would you improve about your design?
- Check for understand: When you touch both parts, you complete a circuit. A tiny electrical signal flows through you, and the micro:bit detects it and plays a sound.
- What was the input?
- What was the output?
- What caused the sound?
- Reflection
- How did your body help the circuit work?
- What caused the music to play?
- How is this different from pressing a button?
- What would you improve about your design?
- Check for understand: When you touch both parts, you complete a circuit. A tiny electrical signal flows through you, and the micro:bit detects it and plays a sound.
- What was the input?
- What was the output?
- What caused the sound?
- Reflection
- How did your body help the circuit work?
- What caused the music to play?
- How is this different from pressing a button?
- What would you improve about your design?
Extension Opportunities
Students can:
-
- Add more foil pads (more notes)
- Compose original music
- Add LED visuals while playing
- Turn into a piano, drum pad, or game controller
- Combine with another micro:bit project
Students can:
-
- Add more foil pads (more notes)
- Compose original music
- Add LED visuals while playing
- Turn into a piano, drum pad, or game controller
- Combine with another micro:bit project
Students can:
-
- Add more foil pads (more notes)
- Compose original music
- Add LED visuals while playing
- Turn into a piano, drum pad, or game controller
- Combine with another micro:bit project