micro:bit Countdown Timer
In this activity, students build a simple but engaging countdown timer using the micro:bit and Microsoft MakeCode. Students program a loop that repeats a sound and displays numbers in sequence, creating a countdown effect.
This lesson intentionally goes beyond coding by transitioning students into physical computing and making. After building their timer, students design and create a simple craft-based project that incorporates their micro:bit as a functional component. For many students, this is their first experience in a makerspace-style activity, where code moves off the screen and into a tangible, interactive object. This countdown timer can easily be added to any physical computing craft, and this activity will conclude by using the timer to countdown to “takeoff” for a craft airplane kit.
Activity Instructions
- Introduce the Activity
- Today, you’re going to program your own countdown—complete with sound and a big ‘GO!’ at the end, but that’s just the beginning. You’re also going to add it into something you can build and use in real life.
- Code the Countdown Timer
- Guide students to:
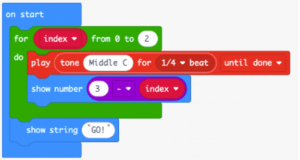
- Inside an “on start button” place the following blocks:
- A (green) for “index” from 0 to 2 do block
- Inside that (green) block nest an orange “play tone middle C for ¼ beat until done” and a show number 3 – index block
- Below the green block add a “show string GO” block
- Introduce Making & Physical Computing
- Discuss:
- Right now, your code lives on the micro:bit. But what if we could use it in the real world?
- Physical computing is when code interacts with the physical world—through objects you design and build.
- Today we will be building a craft airplane (or another craft of your choice) and we will be adding our countdown timer to that object.
- Build the Physical Project / Airplane
- Test & Iterate
- Share & Showcase
- Introduce the Activity
- Today, you’re going to program your own countdown—complete with sound and a big ‘GO!’ at the end, but that’s just the beginning. You’re also going to add it into something you can build and use in real life.
- Code the Countdown Timer
- Guide students to:
- Inside an “on start button” place the following blocks:
- A (green) for “index” from 0 to 2 do block
- Inside that (green) block nest an orange “play tone middle C for ¼ beat until done” and a show number 3 – index block
- Below the green block add a “show string GO” block
- Inside an “on start button” place the following blocks:
- Guide students to:
- Introduce Making & Physical Computing
- Discuss:
- Right now, your code lives on the micro:bit. But what if we could use it in the real world?
- Physical computing is when code interacts with the physical world—through objects you design and build.
- Today we will be building a craft airplane (or another craft of your choice) and we will be adding our countdown timer to that object.
- Discuss:
- Build the Physical Project / Airplane
- Test & Iterate
- Share & Showcase
- Introduce the Activity
- Today, you’re going to program your own countdown—complete with sound and a big ‘GO!’ at the end, but that’s just the beginning. You’re also going to add it into something you can build and use in real life.
- Code the Countdown Timer
- Guide students to:
- Inside an “on start button” place the following blocks:
- A (green) for “index” from 0 to 2 do block
- Inside that (green) block nest an orange “play tone middle C for ¼ beat until done” and a show number 3 – index block
- Below the green block add a “show string GO” block
- Inside an “on start button” place the following blocks:
- Guide students to:
- Introduce Making & Physical Computing
- Discuss:
- Right now, your code lives on the micro:bit. But what if we could use it in the real world?
- Physical computing is when code interacts with the physical world—through objects you design and build.
- Today we will be building a craft airplane (or another craft of your choice) and we will be adding our countdown timer to that object.
- Discuss:
- Build the Physical Project / Airplane
- Test & Iterate
- Share & Showcase
Tips for Running Activity
Makecode (https://makecode.microbit.org/) has a step by step tutorial for a countdown timer within the category “tutorials for the new micro:bit (V2)”.
Makecode (https://makecode.microbit.org/) has a step by step tutorial for a countdown timer within the category “tutorials for the new micro:bit (V2)”.
Makecode (https://makecode.microbit.org/) has a step by step tutorial for a countdown timer within the category “tutorials for the new micro:bit (V2)”.
Extension Opportunities
- Add a button to start the timer
- Incorporate sound effects or animations
- Turn into a game or challenge system
- Combine with other micro:bit inputs (shake, touch, etc.)
- Add a button to start the timer
- Incorporate sound effects or animations
- Turn into a game or challenge system
- Combine with other micro:bit inputs (shake, touch, etc.)
- Add a button to start the timer
- Incorporate sound effects or animations
- Turn into a game or challenge system
- Combine with other micro:bit inputs (shake, touch, etc.)