Adding Motion to Your micro:bit with a Servo Motor
In this activity, students will explore how physical computing can bring simple creations to life by integrating motion into a craft using a micro:bit and an 180° servo motor. While an airplane craft kit is provided as one option, students also have the option to design their own object to incorporate a moving element.
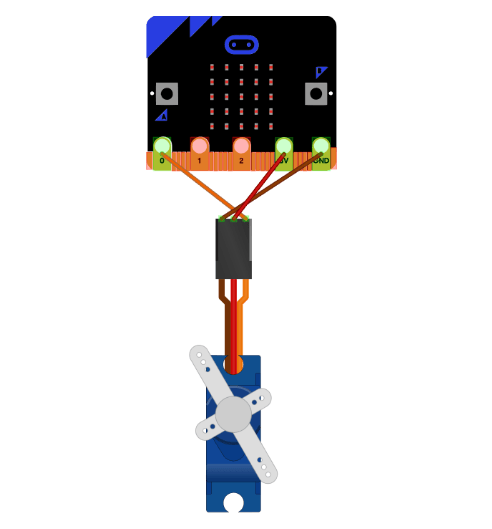
In this activity students learn how servo motors function and connect to the micro:bit via ‘pins.’ Using Microsoft MakeCode, students program the micro:bit to control servo movement, allowing their design to rotate, swing, or animate.
Materials
-
Airplane micro:bit + Servo Propeller
https://drive.google.com/file/d/1Us53097vCkiTWAybB_OdEDxP58o9Qbm5/view?usp=sharing -
Connecting a servo motor to the micro:bit
https://youtu.be/qdX86in2YXo?si=gzVKXvP3GQKsOMF7 -
How to code servo/pin function
https://makecode.microbit.org/reference/pins/servo-write-pin -
Using a servo with the micro:bit
https://support.microbit.org/support/solutions/articles/19000101864-using-a-servo-with-the-micro-bit
Activity Instructions
- Introduce the activity
- Introduce physical computing: “How can you code real objects to move?”
- Show examples of servo motion (swinging arm, rotating propeller, animated sign)
- Explain real-world uses (robotics, automation, engineering design)
- Wiring & Concept Mini-Lesson
- Video: https://youtu.be/qdX86in2YXo?si=abjkzT1SKANZsNP4
- Introduce servo motor wires:
- Brown = Ground
- Red = Power
- Orange = Signal
- Demonstrate how alligator clips with pigtails connect servo wires to micro:bit pins
- Build Phase
- Students construct the physical structure that will hold or support the servo-driven motion. Choose one path:
- Option A: Follow airplane craft kit instructions
- Option B: Design a custom craft that includes a moving part
- Coding the Servo
- Open Microsoft MakeCode for micro:bit
- Introduce basic servo blocks:
- Set servo position (0–180°)
- On button press or loop control
- Students test and adjust movement range
- Encourage iteration: “What angle (0-180) works best for your design?”
- Integration & Testing
- Attach servo securely to craft
- Download and run code
- Observe movement
- Debug wiring or adjust code if needed
- Encourage peer troubleshooting
- Introduce the activity
- Introduce physical computing: “How can you code real objects to move?”
- Show examples of servo motion (swinging arm, rotating propeller, animated sign)
- Explain real-world uses (robotics, automation, engineering design)
- Wiring & Concept Mini-Lesson
- Video: https://youtu.be/qdX86in2YXo?si=abjkzT1SKANZsNP4
- Introduce servo motor wires:
- Brown = Ground
- Red = Power
- Orange = Signal
- Demonstrate how alligator clips with pigtails connect servo wires to micro:bit pins
- Build Phase
- Students construct the physical structure that will hold or support the servo-driven motion. Choose one path:
- Option A: Follow airplane craft kit instructions
- Option B: Design a custom craft that includes a moving part
- Students construct the physical structure that will hold or support the servo-driven motion. Choose one path:
- Coding the Servo
- Open Microsoft MakeCode for micro:bit
- Introduce basic servo blocks:
- Set servo position (0–180°)
- On button press or loop control
- Students test and adjust movement range
- Encourage iteration: “What angle (0-180) works best for your design?”
- Integration & Testing
- Attach servo securely to craft
- Download and run code
- Observe movement
- Debug wiring or adjust code if needed
- Encourage peer troubleshooting
- Introduce the activity
- Introduce physical computing: “How can you code real objects to move?”
- Show examples of servo motion (swinging arm, rotating propeller, animated sign)
- Explain real-world uses (robotics, automation, engineering design)
- Wiring & Concept Mini-Lesson
- Video: https://youtu.be/qdX86in2YXo?si=abjkzT1SKANZsNP4
- Introduce servo motor wires:
- Brown = Ground
- Red = Power
- Orange = Signal
- Demonstrate how alligator clips with pigtails connect servo wires to micro:bit pins
- Build Phase
- Students construct the physical structure that will hold or support the servo-driven motion. Choose one path:
- Option A: Follow airplane craft kit instructions
- Option B: Design a custom craft that includes a moving part
- Students construct the physical structure that will hold or support the servo-driven motion. Choose one path:
- Coding the Servo
- Open Microsoft MakeCode for micro:bit
- Introduce basic servo blocks:
- Set servo position (0–180°)
- On button press or loop control
- Students test and adjust movement range
- Encourage iteration: “What angle (0-180) works best for your design?”
- Integration & Testing
- Attach servo securely to craft
- Download and run code
- Observe movement
- Debug wiring or adjust code if needed
- Encourage peer troubleshooting
Tips for Running Activity
- Build and make a test model before executing this activity with students
- Know your supplies – if you have many colors of cords, be prepared to help students navigate through connecting the servo to micro:bit in small groups
- Start with simple code first so everyone is successful moving their servo motor together before allowing them to make alterations for their creation
- Build and make a test model before executing this activity with students
- Know your supplies – if you have many colors of cords, be prepared to help students navigate through connecting the servo to micro:bit in small groups
- Start with simple code first so everyone is successful moving their servo motor together before allowing them to make alterations for their creation
- Build and make a test model before executing this activity with students
- Know your supplies – if you have many colors of cords, be prepared to help students navigate through connecting the servo to micro:bit in small groups
- Start with simple code first so everyone is successful moving their servo motor together before allowing them to make alterations for their creation
Assessment Opportunities
Students share:
- What they built
- What movement they programmed
- One challenge they solved
- One improvement they would mak
Students share:
- What they built
- What movement they programmed
- One challenge they solved
- One improvement they would mak
Students share:
- What they built
- What movement they programmed
- One challenge they solved
- One improvement they would mak
Extension Opportunities
- Extension: Add sensor input (button, light, motion trigger) to control servo behavior
- Advanced: Create multi-step motion sequences or synchronized movements
- Extension: Add sensor input (button, light, motion trigger) to control servo behavior
- Advanced: Create multi-step motion sequences or synchronized movements
- Extension: Add sensor input (button, light, motion trigger) to control servo behavior
- Advanced: Create multi-step motion sequences or synchronized movements