micro:bit + Teachable Machine
In this activity, students explore artificial intelligence by building a sound recognition system using Teachable Machine and connecting it to a micro:bit through the Teachable Micro:Bit App.
Students begin by training a machine learning model to classify different sounds— snapping, clapping, and whistling—by collecting audio samples for each class.
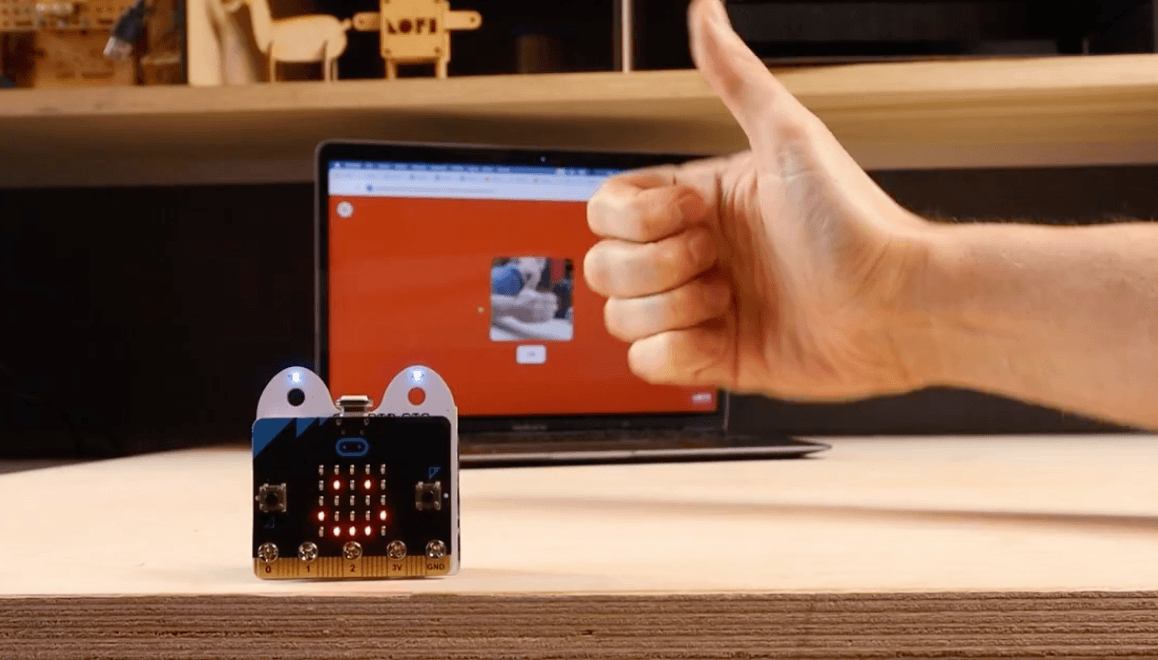
Once trained, the model is exported and loaded into the Teachable Micro:Bit App, which uses the device’s microphone and camera to run the model in real time. The app sends the recognized class labels (e.g., “clap”, “snap”, “whistle”) to the micro:bit via Bluetooth, allowing students to program responses such as displaying icons, triggering sounds, or activating outputs.
Materials
-
Teachable Machine Tutorial: Snap, Clap, Whistle
https://medium.com/@warronbebster/teachable-machine-tutorial-snap-clap-whistle-4212fd7f3555 -
Add AI to Any BBC Micro:Bit Robot – Easy Tutorial with Teachable Machine Video
https://youtu.be/En82uzPC7Zs?si=I-uLHY32PVjUrou6 -
Example MakeCode
https://makecode.microbit.org/#pub:_FYP3CTgCKW5E -
Teachable Micro:Bit web app instructions
https://cardboard.lofirobot.com/teachable-microbit-app-info/
Activity Instructions
- Introduce the activity
- Discuss
- What if your computer could hear the difference between a clap and a whistle?
- How would we teach a computer to recognize sounds?
- Today, you’re going to train your own AI.
- Introduce Machine Learning
- Machine learning means teaching a computer using examples instead of step-by-step instructions.
- Explain simply:
- You give examples (dataset)
- The computer finds patterns in the data
- It predicts what new inputs are
- We’re going to teach it three sounds: snap, clap, and whistle.
- Train the Model
- Guide students in Teachable Machine:
- Start a Sound Project
- Create classes:
- Snap
- Clap
- Whistle
- Record multiple samples for each
- The more examples you give, the smarter your AI becomes. Models learn by using labeled examples of each class
- Train & Test
- Now let’s see what your AI learned.
- Students:
- Click Train Model
- Test each sound
- Discuss:
- Does it recognize your sounds correctly?
- Optional:
- If it does not recognize your sounds add more data to each class and retrain.
- Connect to micro:bit
- Now we connect your AI to a real device. We will use the Teachable Micro:bit App, the app sends the detected sound label to your micro:bit.
- Guide students to connecting teachable machine to the Teachable Micro:bit App:
- Export the Model to the Cloud – Within Teachable Machine, export the model to the cloud. You will receive a link that looks something like this: https://teachablemachine.withgoogle.com/models/Jgyr546VH/
- Open the Teachable Micro:Bit App – On your laptop or mobile device, open the app and click the START image button. A prompt window will appear where you need to paste the link to your Teachable Machine model.
- Allow Camera Access – Allow the browser to use your device camera. After loading the model, you should see a camera preview and the names of detected classes displayed below the camera window.
- Prepare Your Micro:Bit – Use MakeCode to write a program that allows the Micro:Bit to connect to Bluetooth UART and receive string data. You can find a sample code snippet below.
- Connect to the Micro:Bit – Click the robot head icon in the upper-right corner to connect to the Micro:Bit board.
- Control Actions – Once the connection is established, the Micro:Bit will receive class names from the app. You can then control the robot’s actions based on these messages using your Micro:Bit code.
- For help see link: https://cardboard.lofirobot.com/teachable-microbit-app-info/
- Program micro:bit Responses
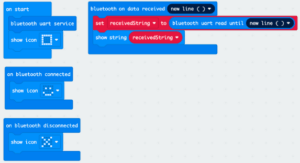
- Use MakeCode to program the micro:bit. The program will activate bluetooth UART on the Micro:Bit board and display received strings as text on the board display.
- In MakeCode:
- Use Bluetooth UART (receive string)
- Add logic:
- If message = “clap” → show icon
- If message = “snap” → play sound
- If message = “whistle” → display animation
- Walk students through creating the following code or use the provided link to share the completed code with students.
- Test the System
- Download the code to your micro:bit
- Students:
- Snap
- Clap
- Whistle
- Discuss
- Does the micro:bit respond correctly?
- Improve the Model
- If it’s not working perfectly—that’s normal. We can update the dataset to improve our model.
- Guide improvements:
- Add more training samples to each dataset
- Clean / Remove inconsistent data
- Retrain model
- Introduce the activity
- Discuss
- What if your computer could hear the difference between a clap and a whistle?
- How would we teach a computer to recognize sounds?
- Today, you’re going to train your own AI.
- Discuss
- Introduce Machine Learning
- Machine learning means teaching a computer using examples instead of step-by-step instructions.
- Explain simply:
- You give examples (dataset)
- The computer finds patterns in the data
- It predicts what new inputs are
- We’re going to teach it three sounds: snap, clap, and whistle.
- Train the Model
- Guide students in Teachable Machine:
- Start a Sound Project
- Create classes:
- Snap
- Clap
- Whistle
- Record multiple samples for each
- The more examples you give, the smarter your AI becomes. Models learn by using labeled examples of each class
- Guide students in Teachable Machine:
- Train & Test
- Now let’s see what your AI learned.
- Students:
- Click Train Model
- Test each sound
- Discuss:
- Does it recognize your sounds correctly?
- Optional:
- If it does not recognize your sounds add more data to each class and retrain.
- Connect to micro:bit
- Now we connect your AI to a real device. We will use the Teachable Micro:bit App, the app sends the detected sound label to your micro:bit.
- Guide students to connecting teachable machine to the Teachable Micro:bit App:
- Export the Model to the Cloud – Within Teachable Machine, export the model to the cloud. You will receive a link that looks something like this: https://teachablemachine.withgoogle.com/models/Jgyr546VH/
- Open the Teachable Micro:Bit App – On your laptop or mobile device, open the app and click the START image button. A prompt window will appear where you need to paste the link to your Teachable Machine model.
- Allow Camera Access – Allow the browser to use your device camera. After loading the model, you should see a camera preview and the names of detected classes displayed below the camera window.
- Prepare Your Micro:Bit – Use MakeCode to write a program that allows the Micro:Bit to connect to Bluetooth UART and receive string data. You can find a sample code snippet below.
- Connect to the Micro:Bit – Click the robot head icon in the upper-right corner to connect to the Micro:Bit board.
- Control Actions – Once the connection is established, the Micro:Bit will receive class names from the app. You can then control the robot’s actions based on these messages using your Micro:Bit code.
- For help see link: https://cardboard.lofirobot.com/teachable-microbit-app-info/
- Program micro:bit Responses
- Use MakeCode to program the micro:bit. The program will activate bluetooth UART on the Micro:Bit board and display received strings as text on the board display.
- In MakeCode:
- Use Bluetooth UART (receive string)
- Add logic:
- If message = “clap” → show icon
- If message = “snap” → play sound
- If message = “whistle” → display animation
- Walk students through creating the following code or use the provided link to share the completed code with students.
- Test the System
- Download the code to your micro:bit
- Students:
- Snap
- Clap
- Whistle
- Discuss
- Does the micro:bit respond correctly?
- Improve the Model
- If it’s not working perfectly—that’s normal. We can update the dataset to improve our model.
- Guide improvements:
- Add more training samples to each dataset
- Clean / Remove inconsistent data
- Retrain model
- Introduce the activity
- Discuss
- What if your computer could hear the difference between a clap and a whistle?
- How would we teach a computer to recognize sounds?
- Today, you’re going to train your own AI.
- Discuss
- Introduce Machine Learning
- Machine learning means teaching a computer using examples instead of step-by-step instructions.
- Explain simply:
- You give examples (dataset)
- The computer finds patterns in the data
- It predicts what new inputs are
- We’re going to teach it three sounds: snap, clap, and whistle.
- Train the Model
- Guide students in Teachable Machine:
- Start a Sound Project
- Create classes:
- Snap
- Clap
- Whistle
- Record multiple samples for each
- The more examples you give, the smarter your AI becomes. Models learn by using labeled examples of each class
- Guide students in Teachable Machine:
- Train & Test
- Now let’s see what your AI learned.
- Students:
- Click Train Model
- Test each sound
- Discuss:
- Does it recognize your sounds correctly?
- Optional:
- If it does not recognize your sounds add more data to each class and retrain.
- Connect to micro:bit
- Now we connect your AI to a real device. We will use the Teachable Micro:bit App, the app sends the detected sound label to your micro:bit.
- Guide students to connecting teachable machine to the Teachable Micro:bit App:
- Export the Model to the Cloud – Within Teachable Machine, export the model to the cloud. You will receive a link that looks something like this: https://teachablemachine.withgoogle.com/models/Jgyr546VH/
- Open the Teachable Micro:Bit App – On your laptop or mobile device, open the app and click the START image button. A prompt window will appear where you need to paste the link to your Teachable Machine model.
- Allow Camera Access – Allow the browser to use your device camera. After loading the model, you should see a camera preview and the names of detected classes displayed below the camera window.
- Prepare Your Micro:Bit – Use MakeCode to write a program that allows the Micro:Bit to connect to Bluetooth UART and receive string data. You can find a sample code snippet below.
- Connect to the Micro:Bit – Click the robot head icon in the upper-right corner to connect to the Micro:Bit board.
- Control Actions – Once the connection is established, the Micro:Bit will receive class names from the app. You can then control the robot’s actions based on these messages using your Micro:Bit code.
- For help see link: https://cardboard.lofirobot.com/teachable-microbit-app-info/
- Program micro:bit Responses
- Use MakeCode to program the micro:bit. The program will activate bluetooth UART on the Micro:Bit board and display received strings as text on the board display.
- In MakeCode:
- Use Bluetooth UART (receive string)
- Add logic:
- If message = “clap” → show icon
- If message = “snap” → play sound
- If message = “whistle” → display animation
- Walk students through creating the following code or use the provided link to share the completed code with students.
- Test the System
- Download the code to your micro:bit
- Students:
- Snap
- Clap
- Whistle
- Discuss
- Does the micro:bit respond correctly?
- Improve the Model
- If it’s not working perfectly—that’s normal. We can update the dataset to improve our model.
- Guide improvements:
- Add more training samples to each dataset
- Clean / Remove inconsistent data
- Retrain model
Tips for Running Activity
- The micro:bit must be worn for this activity
- The micro:bit doesn’t collect data on sound, so connecting it to AI only uses movement / accelerometer data
- Expect:
- Inconsistent models (this is GOOD for learning)
- Need for clear, repeated training data
- Emphasize:
- AI depends on the data we give it
- AI makes predictions, not perfect decisions
- Humans are responsible for training and improving AI
- The micro:bit must be worn for this activity
- The micro:bit doesn’t collect data on sound, so connecting it to AI only uses movement / accelerometer data
- Expect:
- Inconsistent models (this is GOOD for learning)
- Need for clear, repeated training data
- Emphasize:
- AI depends on the data we give it
- AI makes predictions, not perfect decisions
- Humans are responsible for training and improving AI
- The micro:bit must be worn for this activity
- The micro:bit doesn’t collect data on sound, so connecting it to AI only uses movement / accelerometer data
- Expect:
- Inconsistent models (this is GOOD for learning)
- Need for clear, repeated training data
- Emphasize:
- AI depends on the data we give it
- AI makes predictions, not perfect decisions
- Humans are responsible for training and improving AI
Reflection / Exit Ticket Questions
- How did your AI learn to recognize sounds?
- What made your model more accurate?
- What mistakes did it make?
- How is this different from normal coding?
- How did your AI learn to recognize sounds?
- What made your model more accurate?
- What mistakes did it make?
- How is this different from normal coding?
- How did your AI learn to recognize sounds?
- What made your model more accurate?
- What mistakes did it make?
- How is this different from normal coding?
Extension Opportunities
Students can:
- Add more sound categories (e.g., tap, voice commands)
- Control external components (LEDs, servos)
- Build a sound-controlled device
- Compare AI vs non-AI sound detection
Students can:
- Add more sound categories (e.g., tap, voice commands)
- Control external components (LEDs, servos)
- Build a sound-controlled device
- Compare AI vs non-AI sound detection
Students can:
- Add more sound categories (e.g., tap, voice commands)
- Control external components (LEDs, servos)
- Build a sound-controlled device
- Compare AI vs non-AI sound detection