micro:bit Jukebox
This BBC micro:bit resource guides learners through creating a simple “jukebox” using a micro:bit, where different buttons (A and B) trigger different pre-programmed songs using either MakeCode or Python. It introduces foundational computer science concepts such as input/output, event-driven programming, and basic coding structures by having students write code that responds to user interactions and produces sound.
Students will learn about the output speaker function of the BBC micro:bit in an engaging, hands-on way for beginners through an exploration of coding and physical computing. The flexibility of this activity encourages creativity (and differentiation) through extensions like customizing tunes, adding visual outputs, or incorporating additional inputs (e.g., shaking the device).
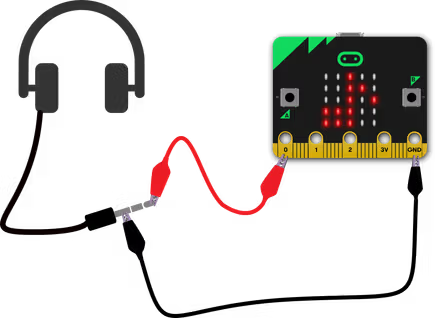
Materials
-
BBC micro:bit project link
https://microbit.org/projects/make-it-code-it/jukebox/ -
BBC micro:bit input / output
https://youtu.be/NkoS2JXaBuM?si=_-AGPW0Gd3027xCL -
Example MakeCode
https://makecode.microbit.org/#pub:_guCi12DwYUKA -
Jukebox Introduction
https://youtu.be/oLTZrTJUcAw?si=3jDPkIxp4wyZaJ9g
Activity Instructions
- Introduction
- Introduce students to the concept of a “jukebox” and review the term with students.
- Ex: “Today you’re going to turn your micro:bit into a mini jukebox! Think about a jukebox—what does it do?”
- Review input / output – YouTube Video
- Play “Jukebox introduction” for a BBC introduction to this activity
- Set up MakeCode
- Guide students to https://makecode.microbit.org/
- Start a new project
- Model Coding the following steps:
- Programming Button A
- Drag out ‘on button A pressed’ block
- Go to Music category
- Add ‘play melody’ block inside
- Programming Button B
- Drag ‘on button B pressed’ block
- Add another ‘play melody’ block
- Choose a different tune
- Test the Code and download to the micro:bit
- Test the code via the simulator on MakeCode
- Guide students through the steps to download the code to the micro:bit
- Click Download
- Transfer to micro:bit
- Press buttons A and B
- Debug & Improve
- Verify with students that their micro:bit worked according to their code.
- If something didn’t work, introduce the concept of “debugging” and explain that is it part of every programmers’ process
- Ask clarifying questions to identify the problem and correct the code:
- Did you put the melody inside the button block?
- Did you download the newest version?
- Clean up and collect the materials
- Introduction
- Introduce students to the concept of a “jukebox” and review the term with students.
- Ex: “Today you’re going to turn your micro:bit into a mini jukebox! Think about a jukebox—what does it do?”
- Review input / output – YouTube Video
- Play “Jukebox introduction” for a BBC introduction to this activity
- Introduce students to the concept of a “jukebox” and review the term with students.
- Set up MakeCode
- Guide students to https://makecode.microbit.org/
- Start a new project
- Model Coding the following steps:
- Programming Button A
- Drag out ‘on button A pressed’ block
- Go to Music category
- Add ‘play melody’ block inside
- Programming Button B
- Drag ‘on button B pressed’ block
- Add another ‘play melody’ block
- Choose a different tune
- Programming Button A
- Test the Code and download to the micro:bit
- Test the code via the simulator on MakeCode
- Guide students through the steps to download the code to the micro:bit
- Click Download
- Transfer to micro:bit
- Press buttons A and B
- Debug & Improve
- Verify with students that their micro:bit worked according to their code.
- If something didn’t work, introduce the concept of “debugging” and explain that is it part of every programmers’ process
- Ask clarifying questions to identify the problem and correct the code:
- Did you put the melody inside the button block?
- Did you download the newest version?
- Clean up and collect the materials
- Introduction
- Introduce students to the concept of a “jukebox” and review the term with students.
- Ex: “Today you’re going to turn your micro:bit into a mini jukebox! Think about a jukebox—what does it do?”
- Review input / output – YouTube Video
- Play “Jukebox introduction” for a BBC introduction to this activity
- Introduce students to the concept of a “jukebox” and review the term with students.
- Set up MakeCode
- Guide students to https://makecode.microbit.org/
- Start a new project
- Model Coding the following steps:
- Programming Button A
- Drag out ‘on button A pressed’ block
- Go to Music category
- Add ‘play melody’ block inside
- Programming Button B
- Drag ‘on button B pressed’ block
- Add another ‘play melody’ block
- Choose a different tune
- Programming Button A
- Test the Code and download to the micro:bit
- Test the code via the simulator on MakeCode
- Guide students through the steps to download the code to the micro:bit
- Click Download
- Transfer to micro:bit
- Press buttons A and B
- Debug & Improve
- Verify with students that their micro:bit worked according to their code.
- If something didn’t work, introduce the concept of “debugging” and explain that is it part of every programmers’ process
- Ask clarifying questions to identify the problem and correct the code:
- Did you put the melody inside the button block?
- Did you download the newest version?
- Clean up and collect the materials
Assessment Opportunities
- Reflection Exit ticket questions:
- What tells the micro:bit when to play music?
- How did you make different songs play?
- What would you add to improve your jukebox?
- Reflection Exit ticket questions:
- What tells the micro:bit when to play music?
- How did you make different songs play?
- What would you add to improve your jukebox?
- Reflection Exit ticket questions:
- What tells the micro:bit when to play music?
- How did you make different songs play?
- What would you add to improve your jukebox?
Extension Opportunities
The following are examples of prompts to give students to add additional functionality to their code and make their Jukebox even better:
- Add Button A+B for a third song
- Use ‘on shake’ to play music
- Create their own melody
- Add LED images while music plays – show different pictures, letters, numbers or words depending on which tune you picked.
- Change the tunes, for example try PRELUDE or ENTERTAINER
The following are examples of prompts to give students to add additional functionality to their code and make their Jukebox even better:
- Add Button A+B for a third song
- Use ‘on shake’ to play music
- Create their own melody
- Add LED images while music plays – show different pictures, letters, numbers or words depending on which tune you picked.
- Change the tunes, for example try PRELUDE or ENTERTAINER
The following are examples of prompts to give students to add additional functionality to their code and make their Jukebox even better:
- Add Button A+B for a third song
- Use ‘on shake’ to play music
- Create their own melody
- Add LED images while music plays – show different pictures, letters, numbers or words depending on which tune you picked.
- Change the tunes, for example try PRELUDE or ENTERTAINER